Printer Setup
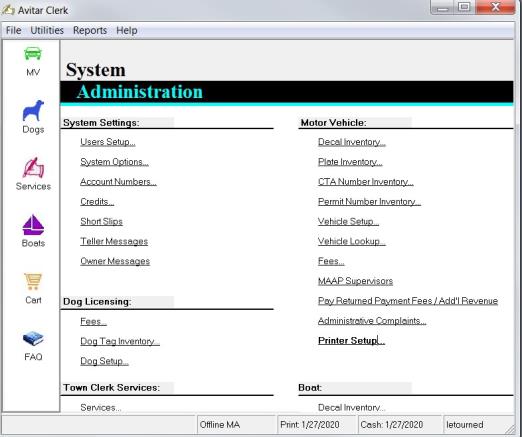
The Printer Setup menu item allows you to select the printer and printer settings to be used by the program. Expand the Printer type module below for instructions on how to configure specific printer settings for your workstation:
Download Drivers
Download and Configure the HP Printer Driver for the specific printer. Always download the latest HP Printer driver for the specific printer from the HP support web site. If you need to use the HP Universal Printer drive, then select HP Universal Print Driver for Windows PCL6 with the USB mode – Plug and Play option.
Setup Printer
Setup a printer for each tray using the Windows Add Printer option:
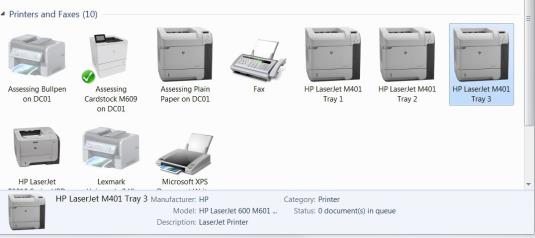
TRAY 1: under Printing Preferences
Label: HP LaserJet M401 Tray 1
Paper Source: Tray 1
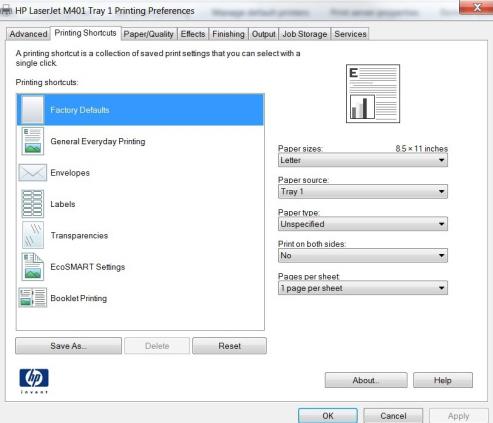
TRAY 2: under Printing Preferences
Label: HP LaserJet M401 Tray 2
Paper Source: Tray 2
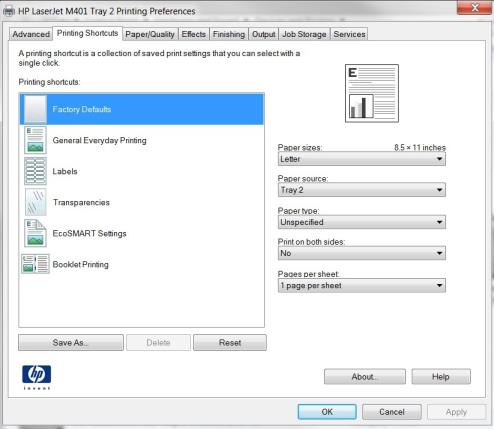
TRAY 3: under Printing Preferences
Label: HP LaserJet M401 Tray 3
Paper Source: Tray 3
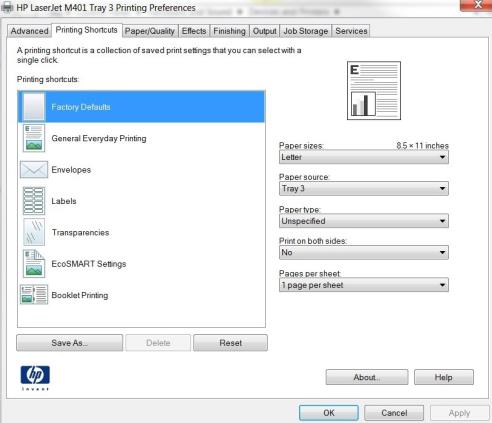
- Load paper in each tray:
- Tray 2: DMV watermark paper (RDMV 344)
- Tray 3: plain white paper
- Verify that the tray stopper is set to "LTR" for each tray.
- Print a Windows "Test Page" for each paper tray for the appropriate paper.
- Configure the Avitar Clerk software using the Printer Setup menu option:
- Hardware Configurations:
- Tray 1 – manual paper feed
- Tray 2 – top paper drawer
- Tray 3 – bottom paper drawer
- Paper Source Options:
- Default = based on workstation printer option and/or receipt option
- Upper = tray 1
- Middle = tray 2
- Lower = tray 3
- Manual = tray 1
- Prompt MP = prompt to load paper in the tray 1 before printing
TITLE (Tray 3):
- Physical Printer: HP LaserJet M401 Tray 3
- Paper Source: Default
- SAVE
- Print a Test Page
- Not working – Change Paper Source to Lower or Middle
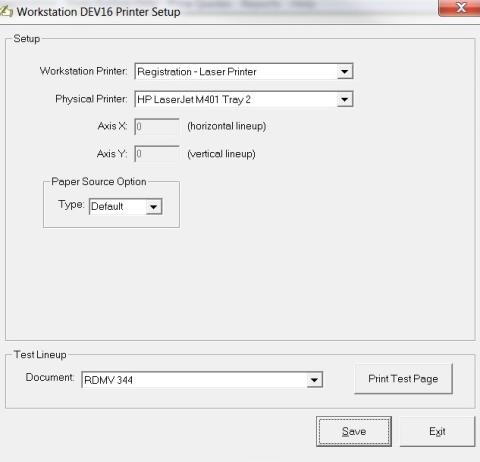
REGISTRATION – LASER PRINTER (Tray 2):
- Physical Printer: HP LaserJet M401 Tray 2
- Paper Source: Default
- SAVE
- Print a Test Page
- Not working – Change Paper Source to Upper
RECEIPT
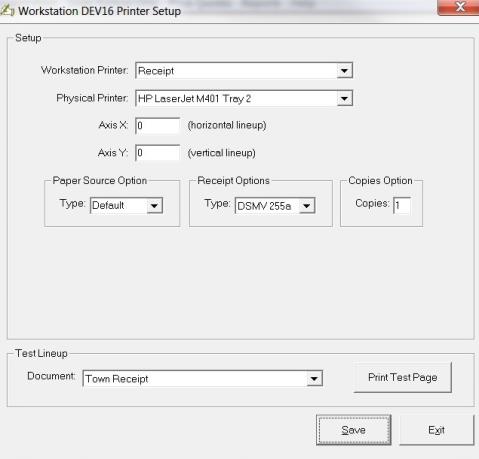
For the DSMV 255a on watermark paper (Tray 2):
- Physical Printer: HP LaserJet M401 Tray 2
- Paper Source: Default
- Receipt Option: DSMV 255a
- Copy Option: 1
- SAVE
- Print a Test Page
- Not working – Change Paper Source to Upper
For the DSMV 255a on plain paper (Tray 3):
- Physical Printer: HP LaserJet M401 Tray 3
- Paper Source: Default
- Receipt Option: DSMV 255a
- Copy Option: 1
- SAVE
- Print a Test Page
- Not working – Change Paper Source to Lower or Middle
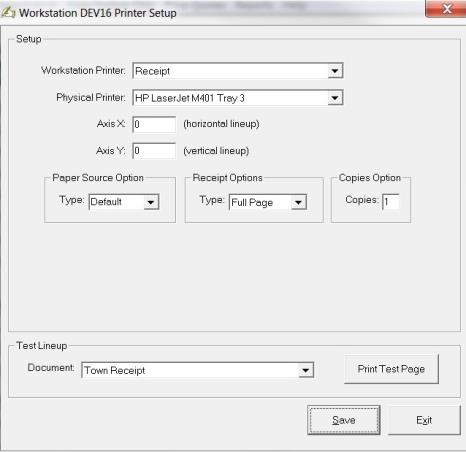
For the Full Page on plain paper (Tray 3):
- Physical Printer: HP LaserJet M401 Tray 3
- Paper Source: Default
- Receipt Option: Full Page
- Copy Option: 2
- SAVE
- Print a Test Page
- Not working – Change Paper Source to Lower
DMV SS/CR MEMOS
For the DMV SS/CR Memos on watermark paper (Tray 2):
- Physical Printer: HP LaserJet M401 Tray 2
- Paper Source: Default
- SAVE
- Print a Test Page
- Not working – Change Paper Source to Upper
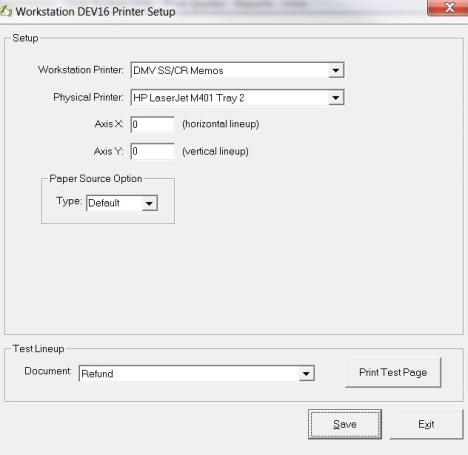
For the DMV SS/CR on plain paper (Tray 3):
- Physical Printer: HP LaserJet M401 Tray 3
- Paper Source: Default
- SAVE
- Print a Test Page
- Not working – Change Paper Source to Lower or Middle
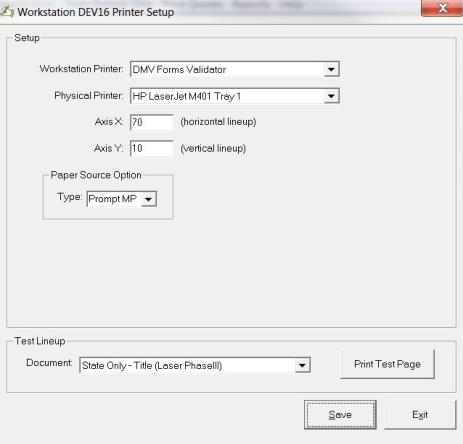
DMV FORMS VALIDATOR
- Physical Printer: HP LaserJet M401 Tray 1
- Paper Source: Prompt MP
- Change Axis X to 70, Axis Y to 10
- SAVE
- Put a piece of white plain paper in the Manual Paper Feeder
- Print a Test Page
- Not working – Change Paper Source to Manual
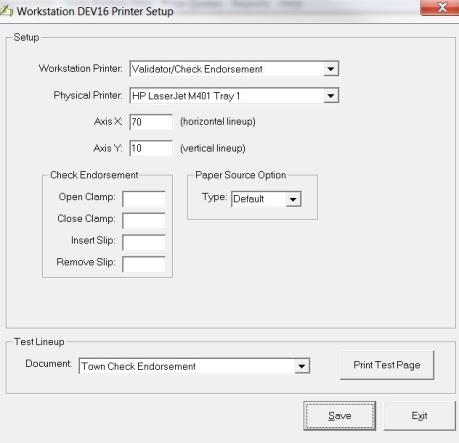
VALIDATOR/CHECK ENDORSEMENT
- Physical Printer: HP LaserJet M401 Tray 1
- Paper Source: Manual
- Change Axis X to 70, Axis Y to 10
- SAVE
- Put a piece of white plain paper in the Manual Paper Feeder
- Print a Test Page
- Not working – Change Paper Source to Manual
CASH DRAWER
If the workstation does not have a cash drawer, do not assign a printer since this will cause a blank paper to print after fee settlement.
Download Drivers
Download and Configure the HP Printer Driver for the specific printer. Always download the latest HP Printer driver for the specific printer from the HP support web site. If you need to use the HP Universal Printer drive, then select HP Universal Print Driver for Windows PCL6 with the USB mode – Plug and Play option.
Setup Printer
Setup a printer for each tray using the Windows Add Printer option:
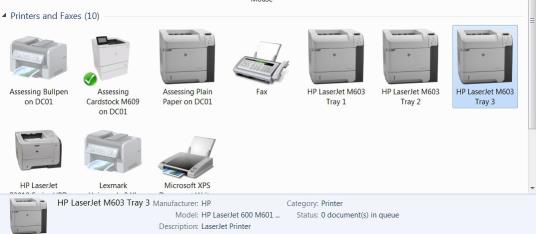
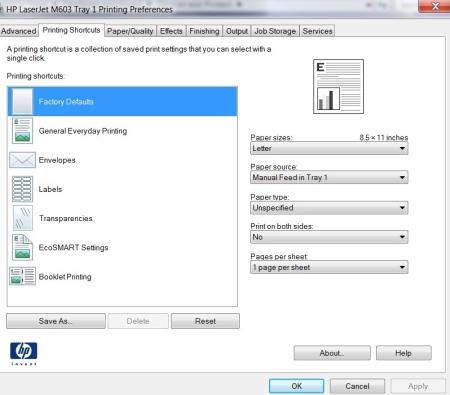
TRAY 1: under Printing Preferences
Label: HP LaserJet M603 Tray 1
Paper Source: Manual Feed in Tray 1
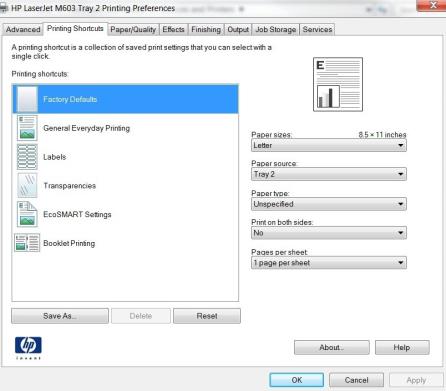
TRAY 2: under Printing Preferences
Label: HP LaserJet M603 Tray 2
Paper Source: Tray 2
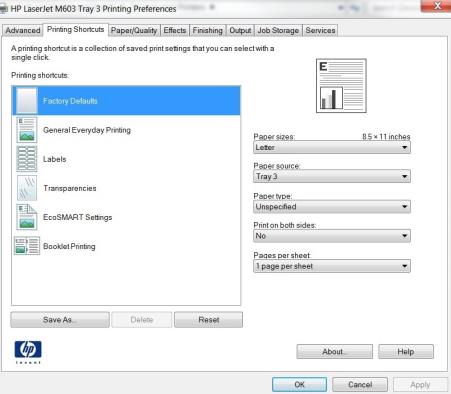
TRAY 3: under Printing Preferences
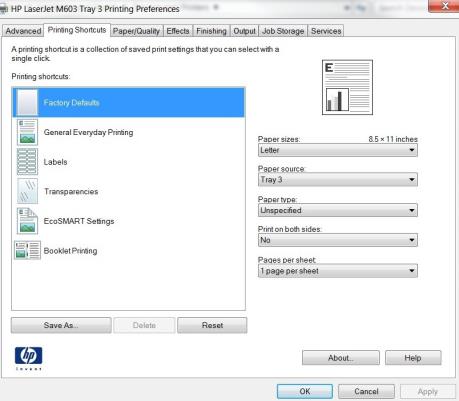
Label: HP LaserJet M603 Tray 3
Paper Source: Tray 3
- Load paper in each tray:
- Tray 2: plain white paper
- Tray 3: DMV watermark paper (RDMV 344)
- Verify that the tray stopper is set to "LTR" for each tray.
- Print a Windows "Test Page" for each paper tray for the appropriate paper.
- Configure the Avitar Clerk software using the Printer Setup menu option:
- Utilities > System Administration > Printer Setup
- Hardware Configurations:
- Tray 1 – manual paper feed
- Tray 2 – top paper drawer
- Tray 3 – bottom paper drawer
- Paper Source Options:
- Default = based on workstation printer option and/or receipt option
- Upper = tray 1
- Middle = tray 2
- Lower = tray 3
- Manual = tray 1
- Prompt MP = prompt to load paper in the tray 1 before printing
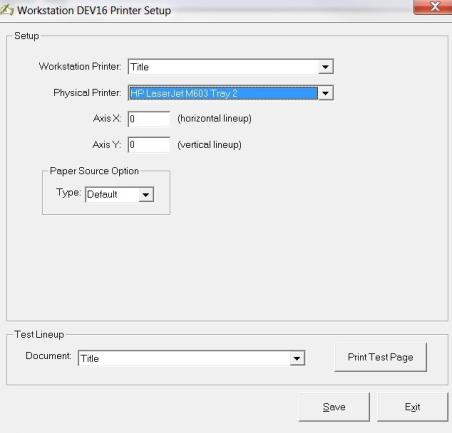
TITLE (Tray 2):
- Physical Printer: HP LaserJet M603 Tray 2
- Paper Source: Default
- SAVE
- Print a Test Page
- Not working – Change Paper Source to Upper
REGISTRATION – LASER PRINTER (Tray 3):
- Physical Printer: HP LaserJet M603 Tray 3
- Paper Source: Default
- SAVE
- Print a Test Page
- Not working – Change Paper Source to Lower or Middle
RECEIPT
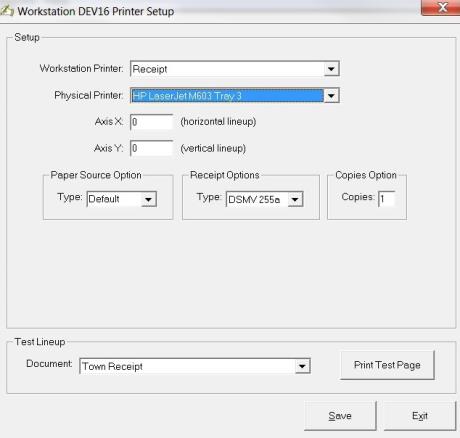
For the DSMV 255a on watermark paper (Tray 3):
- Physical Printer: HP LaserJet M603 Tray 3
- Paper Source: Default
- Receipt Option: DSMV 255a
- Copy Option: 1
- SAVE
- Print a Test Page
- Not working – Change Paper Source to Lower or Middle
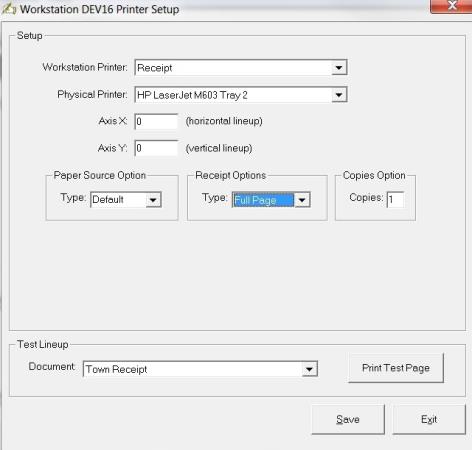
For the DSMV 255a on plain paper (Tray 2):
- Physical Printer: HP LaserJet M603 Tray 2
- Paper Source: Default
- Receipt Option: DSMV 255a
- Copy Option: 1
- SAVE
- Print a Test Page
- Not working – Change Paper Source to Upper
For the Full Page on plain paper (Tray2):
- Physical Printer: HP LaserJet M603 Tray 2
- Paper Source: Default
- Receipt Option: Full Page
- Copy Option: 2
- SAVE
- Print a Test Page
- Not working – Change Paper Source to Upper
DMV SS/CR MEMOS
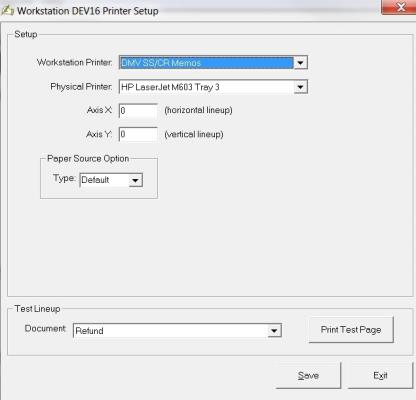
For the DMV SS/CR Memos on watermark paper (Tray 3):
- Physical Printer: HP LaserJet M603 Tray 3
- Paper Source: Default
- SAVE
- Print a Test Page
- Not working – Change Paper Source to Lower or Middle
For the DMV SS/CR on plain paper (Tray 2):
- Physical Printer: HP LaserJet M603 Tray 2
- Paper Source: Default
- SAVE
- Print a Test Page
- Not working – Change Paper Source to Upper
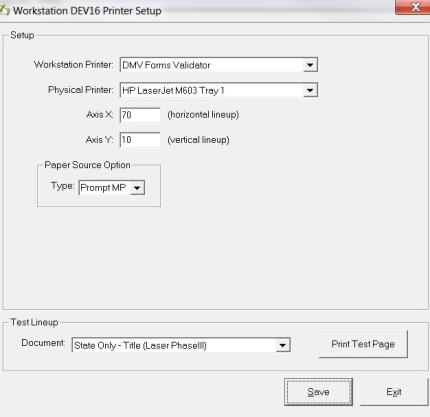
DMV FORMS VALIDATOR
- Physical Printer: HP LaserJet M603 Tray 1
- Paper Source: Prompt MP
- Change Axis X to 70, Axis Y to 10
- SAVE
- Put a piece of white plain paper in the Manual Paper Feeder
- Print a Test Page
- Not working – Change Paper Source to Manual
VALIDATOR/CHECK ENDORSEMENT
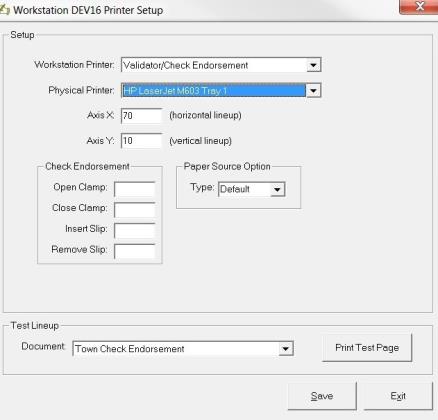
- Physical Printer: HP LaserJet M603 Tray 1
- Paper Source: Manual
- Change Axis X to 70, Axis Y to 10
- SAVE
- Put a piece of white plain paper in the Manual Paper Feeder
- Print a Test Page
- Not working – Change Paper Source to Manual
CASH DRAWER
If the workstation does not have a cash drawer, do not assign a printer since this will cause a blank paper to print after fee settlement.
Download Drivers
Download and Configure the HP Printer Driver for the specific printer. Always download the latest HP Printer driver for the specific printer from the HP support web site. If you need to use the HP Universal Printer drive, then select HP Universal Print Driver for Windows PCL6 with the USB mode – Plug and Play option.
Setup Printer
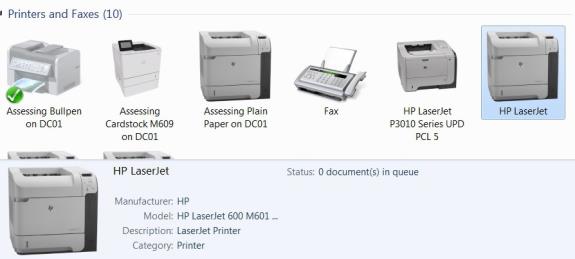
Setup a printer for each tray using the Windows Add Printer option:
- Load paper in each tray:
- Tray 1: no paper
- Tray 2: Plain white paper
- Verify that the tray stopper is set to "LTR" for tray 2.
- Print a Windows "Test Page" for each paper tray for the appropriate paper.
- Configure the Avitar Clerk software using the Printer Setup menu option:
- Utilities > System Administration > Printer Setup
- Hardware Configurations:
- Tray 1 – manual paper feed
- Tray 2 – paper drawer
- Paper Source Options:
- Default = based on workstation printer option and/or receipt option
- Upper = tray 1
- Middle = tray 2
- Lower = tray 2
- Manual = tray 1
- Prompt MP = prompt to load paper in tray 1 before printing
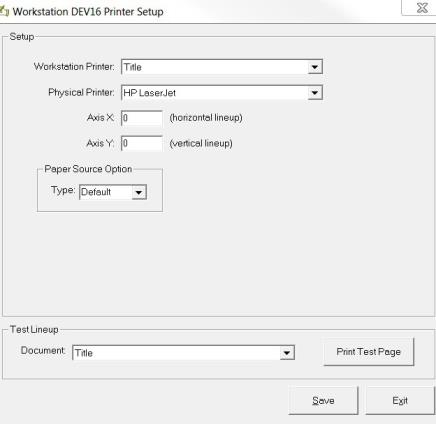
TITLE (Tray 2):
- Physical Printer: HP LaserJet
- Paper Source: Default
- SAVE
- Print a Test Page
- Not working – Change Paper Source to Lower or Middle
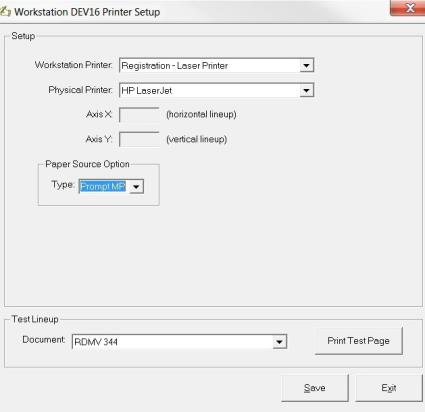
REGISTRATION – LASER PRINTER (Tray 1):
- Physical Printer: HP LaserJet
- Paper Source: Prompt MP
- SAVE
- Print a Test Page
- Not working – Change Paper Source to Upper
RECEIPT
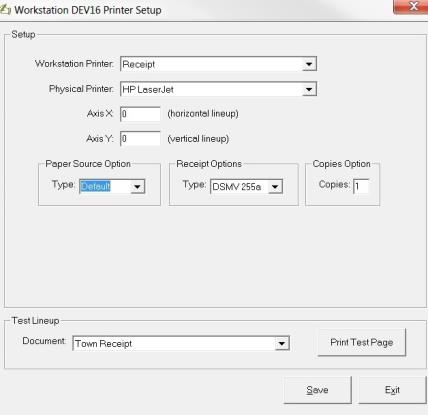
For the DSMV 255a on watermark paper (Tray 1):
- Physical Printer: HP LaserJet
- Paper Source: Prompt MP
- Receipt Option: DSMV 255a
- Copy Option: 1
- SAVE
- Print a Test Page
- Not working – Change Paper Source to Upper
For the DSMV 255a on plain paper (Tray 2):
- Physical Printer: HP LaserJet
- Paper Source: Default
- Receipt Option: DSMV 255a
- Copy Option: 1
- SAVE
- Print a Test Page
- Not working – Change Paper Source to Lower or Middle
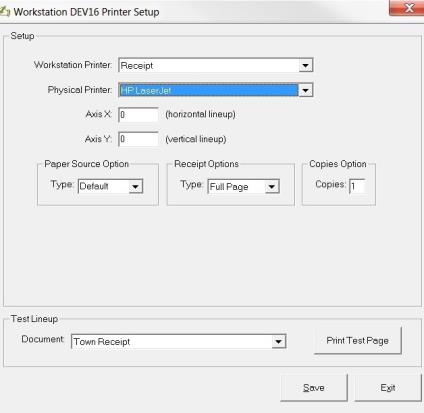
For the Full Page on plain paper (Tray2):
- Physical Printer: HP LaserJet
- Paper Source: Default
- Receipt Option: Full Page
- Copy Option: 2
- SAVE
- Print a Test Page
- Not working – Change Paper Source to Lower
DMV SS/CR MEMOS
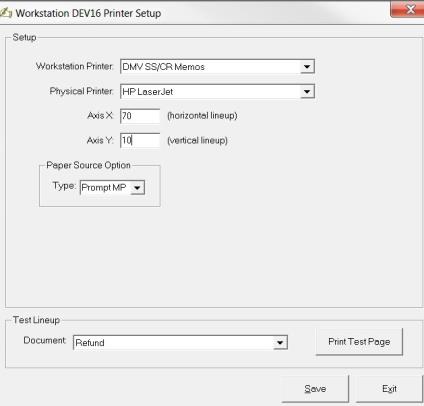
For the DMV SS/CR Memos on watermark paper (Tray 1):
- Physical Printer: HP LaserJet
- Paper Source: Prompt MP
- SAVE
- Print a Test Page
- Not working – Change Paper Source to Upper
For the DMV SS/CR on plain paper (Tray 2):
- Physical Printer: HP LaserJet
- Paper Source: Default
- SAVE
- Print a Test Page
- Not working – Change Paper Source to Lower or Middle
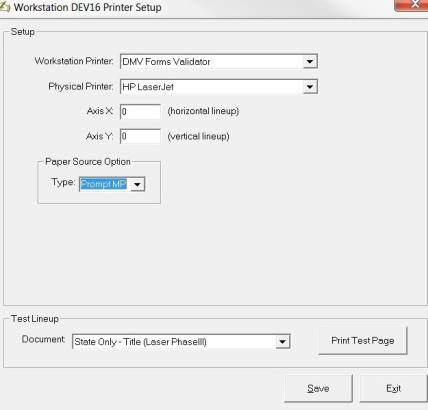
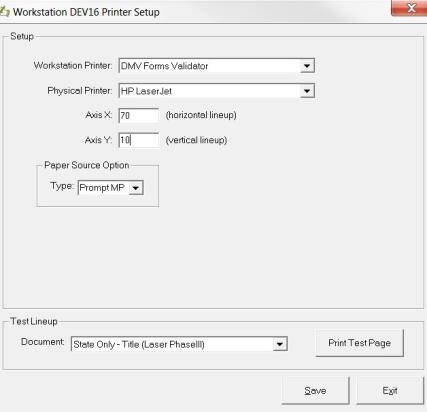
DMV FORMS VALIDATOR
- Physical Printer: HP LaserJet
- Paper Source: Prompt MP
- Change Axis X to 70, Axis Y to 10
- SAVE
- Put a piece of white plain paper in the Manual Paper Feeder
- Print a Test Page
- Not working – Change Paper Source to Manual
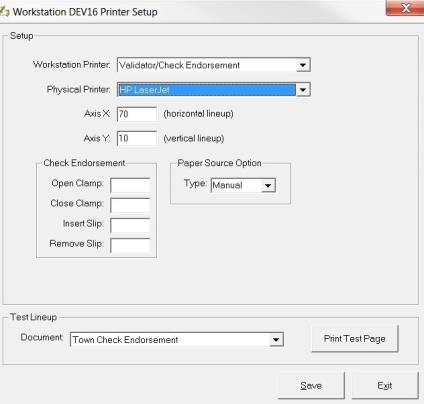
VALIDATOR/CHECK ENDORSEMENT
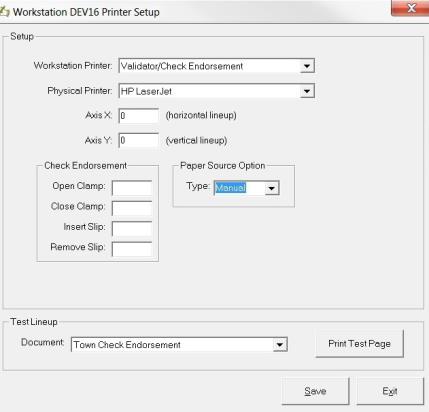
- Physical Printer: HP LaserJet
- Paper Source: Manual
- Change Axis X to 70, Axis Y to 10
- SAVE
- Put a piece of white plain paper in the Manual Paper Feeder
- Print a Test Page
- Not working – Change Paper Source to Manual
CASH DRAWER
If the workstation does not have a cash drawer, do not assign a printer since this will cause a blank paper to print after fee settlement.
Download Drivers
Download and Configure the HP Printer Driver for the specific printer. Always download the latest HP Printer driver for the specific printer from the HP support web site. If you need to use the HP Universal Printer drive, then select HP Universal Print Driver for Windows PCL6 with the USB mode – Plug and Play option.
Setup Printer
Setup a printer for each tray using the Windows Add Printer option:
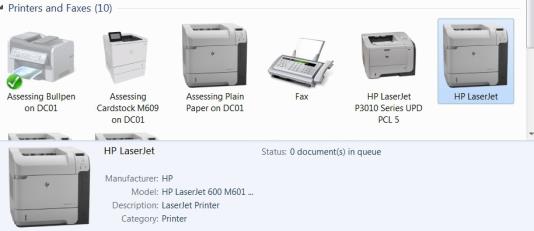
- Load paper in each tray:
- Tray 1: no paper
- Tray 2: DMV Watermark Paper (RDMV 344)
- Verify that the tray stopper is set to "LTR" for tray 2.
- Print a Windows "Test Page" for each paper tray for the appropriate paper.
- Configure the Avitar Clerk software using the Printer Setup menu option:
- Utilities > System Administration > Printer Setup
- Hardware Configurations:
- Tray 1 – manual paper feed
- Tray 2 – paper drawer
- Paper Source Options:
- Default = based on workstation printer option and/or receipt option
- Upper = tray 1
- Middle = tray 2
- Lower = tray 2
- Manual = tray 1
- Prompt MP = prompt to load paper in tray 1 before printing
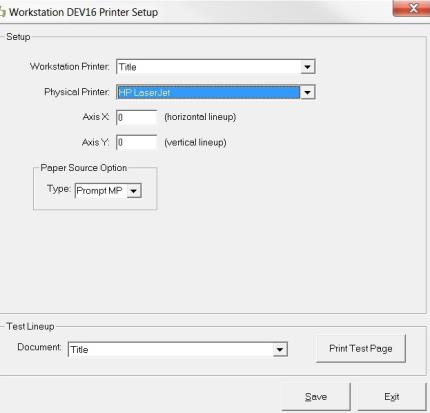
TITLE (Tray 1):
- Physical Printer: HP LaserJet
- Paper Source: Prompt MP
- SAVE
- Print a Test Page
- Not working – Change Paper Source to Lower or Middle
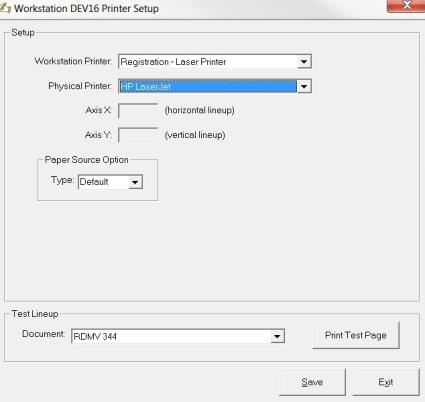
REGISTRATION – LASER PRINTER (Tray 2):
- Physical Printer: HP LaserJet
- Paper Source: Default
- SAVE
- Print a Test Page
- Not working – Change Paper Source to Upper
RECEIPT
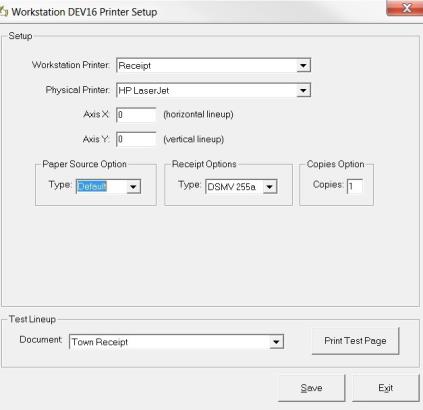
For the DSMV 255a on watermark paper (Tray 2):
- Physical Printer: HP LaserJet
- Paper Source: Default
- Receipt Option: DSMV 255a
- Copy Option: 1
- SAVE
- Print a Test Page
- Not working – Change Paper Source to Upper
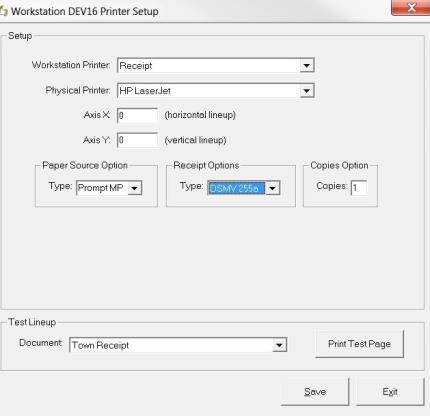
For the DSMV 255a on plain paper (Tray 1):
- Physical Printer: HP LaserJet
- Paper Source: Prompt MP
- Receipt Option: DSMV 255a
- Copy Option: 1
- SAVE
- Print a Test Page
- Not working – Change Paper Source to Lower or Middle
For the Full Page on plain paper (Tray 1):
- Physical Printer: HP LaserJet
- Paper Source: Prompt MP
- Receipt Option: Full Page
- Copy Option: 2
- SAVE
- Print a Test Page
- Not working – Change Paper Source to Lower
DMV SS/CR MEMOS
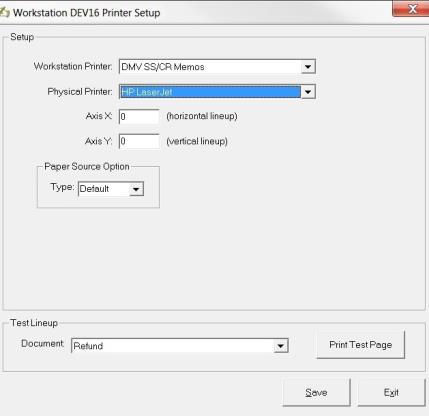
For the DMV SS/CR Memos on watermark paper (Tray 2):
- Physical Printer: HP LaserJet
- Paper Source: Default
- SAVE
- Print a Test Page
- Not working – Change Paper Source to Upper
For the DMV SS/CR on plain paper (Tray 1):
- Physical Printer: HP LaserJet
- Paper Source: Prompt MP
- SAVE
- Print a Test Page
- Not working – Change Paper Source to Lower or Middle
DMV FORMS VALIDATOR
- Physical Printer: HP LaserJet
- Paper Source: Prompt MP
- Change Axis X to 70, Axis Y to 10
- SAVE
- Put a piece of white plain paper in the Manual Paper Feeder
- Print a Test Page
- Not working – Change Paper Source to Manual
VALIDATOR/CHECK ENDORSEMENT
- Physical Printer: HP LaserJet
- Paper Source: Manual
- Change Axis X to 70, Axis Y to 10
- SAVE
- Put a piece of white plain paper in the Manual Paper Feeder
- Print a Test Page
- Not working – Change Paper Source to Manual
CASH DRAWER
If the workstation does not have a cash drawer, do not assign a printer since this will cause a blank paper to print after fee settlement.
Download Drivers
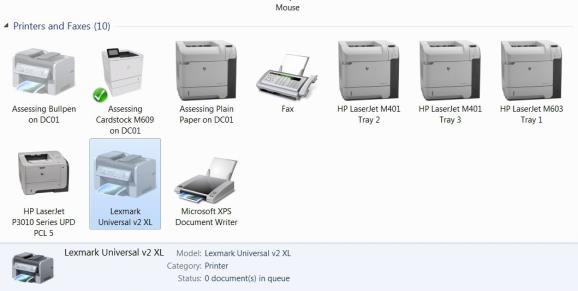
Download and Configure the Lexmark Universal Printer Driver. Always download the latest driver from the Lexmark support web site.
- Change the Manual Paper Feeder Tray Option on the printer:
- The Lexmark printer needs the Configure MP option set to the FIRST option. Note: If you are just replacing the PC for an existing Avitar Clerk client, then this step can be skipped since the Lexmark T640 was previously configured for the old PC.
- Press the Menu button on the front of the printer labeled by a key.
- A Menu list displays
- Using the up and down arrowheads, choosing Paper Menu option, choosing Configure MP option, choosing First option.
- EXIT several times until Menu Display Window displays READY
- Load paper in each tray
- Tray 1: plain white paper
- Tray 2: DMV watermark paper (RDMV 344)
- Verify that the tray stopper is set to "LTR" for each tray.
- Print a Windows "Test Page" for each paper tray for the appropriate paper.
- Configure the Avitar Clerk software using the Printer Setup menu option:
- Utilities > System Administration > Printer Setup
- Hardware Configurations:
- Manual paper feed
- Tray 1 – top paper drawer
- Tray 2 – bottom paper drawer
- Paper Source Options:
- Default = based on workstation printer option and/or receipt option
- Upper = tray 1
- Middle = tray 2
- Lower = tray 3
- Manual = tray 1
- Prompt MP = prompt to load paper in the tray 1 before printing
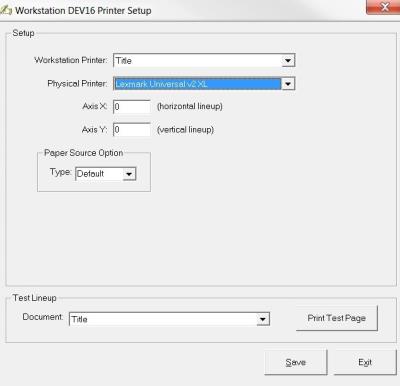
TITLE (Tray 1):
- Physical Printer: Lexmark Universal v2 XL
- Paper Source: Default
- SAVE
- Print a Test Page
- Not working – Change Paper Source to Upper
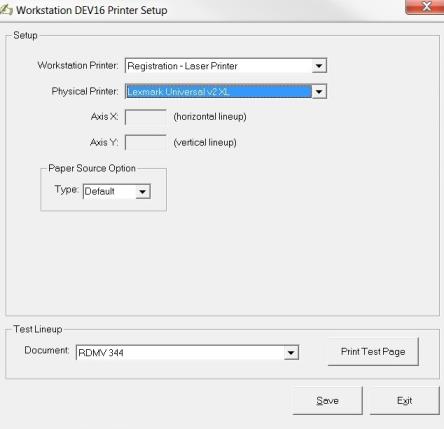
REGISTRATION – LASER PRINTER (Tray 2):
- Physical Printer: Lexmark Universal v2 XL
- Paper Source: Default
- SAVE
- Print a Test Page
- Not working – Change Paper Source to Lower or Middle
RECEIPT
For the DSMV 255a on watermark paper (Tray 2):
- Physical Printer: Lexmark Universal v2 XL
- Paper Source: Default
- Receipt Option: DSMV 255a
- Copy Option: 1
- SAVE
- Print a Test Page
- Not working – Change Paper Source to Lower or Middle
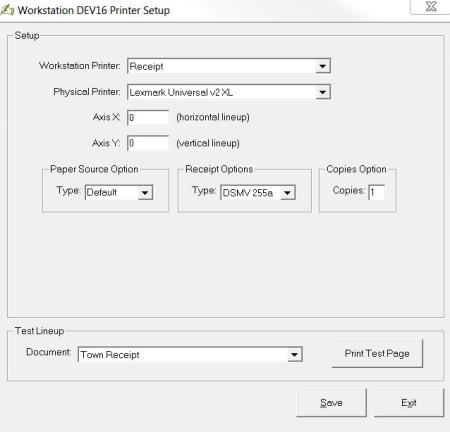
For the DSMV 255a on plain paper (Tray 1):
- Physical Printer: Lexmark Universal v2 XL
- Paper Source: Default
- Receipt Option: DSMV 255a
- Copy Option: 1
- SAVE
- Print a Test Page
- Not working – Change Paper Source to Upper
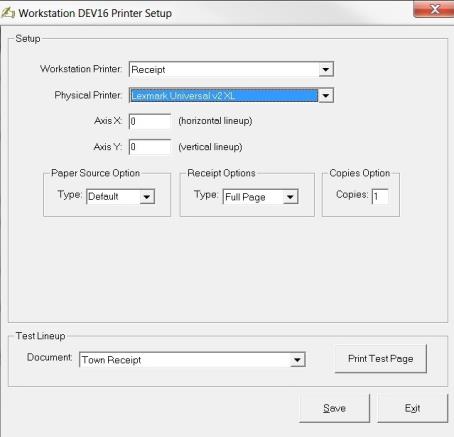
For the Full Page on plain paper (Tray2):
- Physical Printer: Lexmark Universal v2 XL
- Paper Source: Default
- Receipt Option: Full Page
- Copy Option: 2
- SAVE
- Print a Test Page
- Not working – Change Paper Source to Upper
DMV SS/CR MEMOS
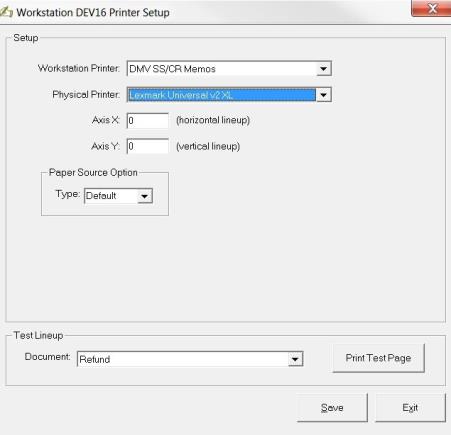
For the DMV SS/CR Memos on watermark paper (Tray 2):
- Physical Printer: Lexmark Universal v2 XL
- Paper Source: Default
- SAVE
- Print a Test Page
- Not working – Change Paper Source to Lower or Middle
For the DMV SS/CR on plain paper (Tray 1):
- Physical Printer: Lexmark Universal v2 XL
- Paper Source: Default
- SAVE
- Print a Test Page
- Not working – Change Paper Source to Upper
DMV FORMS VALIDATOR
- Physical Printer: Lexmark Universal v2 XL
- Change Axis X to 70, Axis Y to 10
- Paper Source: Prompt MP
- SAVE
- Put a piece of white plain paper in the Manual Paper Feeder
- Print a Test Page
- Not working – Change Paper Source to Manual
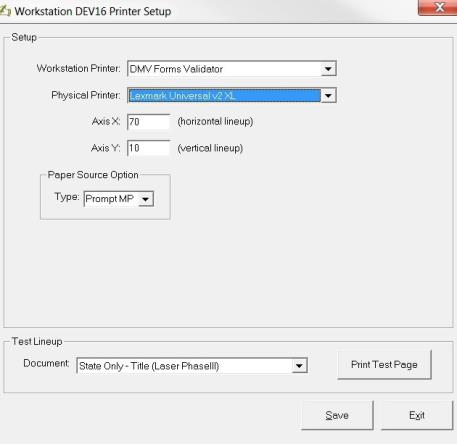
VALIDATOR/CHECK ENDORSEMENT
- Physical Printer: Lexmark Universal v2 XL
- Paper Source: Manual
- Change Axis X to 0, Axis Y to 0
- SAVE
- Put a piece of white plain paper in the Manual Paper Feeder
- Print a Test Page
- Not working – Change Paper Source to Manual
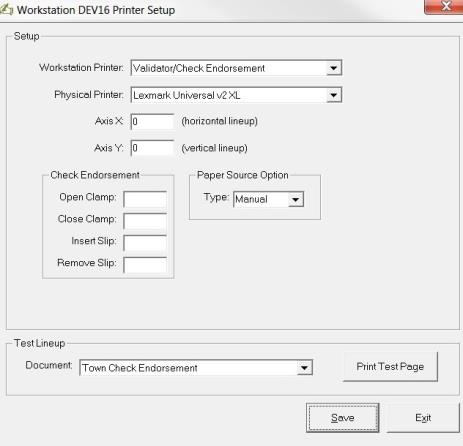
CASH DRAWER
If the workstation does not have a cash drawer, do not assign a printer since this will cause a blank piece of paper to print after fee settlement.
Notes:
-
In order for the Lexmark printer to pull the MAAP forms automatically from the Multipurpose (MP) manual feed tray, the Lexmark printer needs the Configure MP option set to the option named: First.
-
All the steps needed to change the Lexmark Multipurpose (MP) manual feed tray option are to be done on the Lexmark printer. These steps are NOT done on the PC.
-
The steps are done on the Operating Panel (OP) console of the Lexmark.
Steps To Change the MP Feeder Tray Option:
Make sure that the Lexmark printer is turned on. Note that the OP display window on the Lexmark displays the Ready list. This is the normal “home” setting for the Lexmark.
-
Getting to the ‘Paper Menu’
-
Facing the front of the Lexmark printer, press the Menu button. Make sure that you are sitting so that you can see all the options in the OP display window.
-
In the OP display window, a Menus list displays. The first item in the list is Paper Menu.
-
There should be a check mark (√ ) in front of the first item in the list, which is Paper Menu. The check mark indicates that Paper Menu is selected, which is the option we want.
-
If Paper Menu is not selected, use the down or up arrowheads (in the center of the OP console) to move the check mark down or up in the list until it displays in front of Paper Menu.
-
-
Press the check mark button, which is located in the center of the OP console. This will enter your choice and bring up the list of Paper Menu options.
-
-
Getting to ‘Configure MP’
-
The Paper Menu list will now display and there will be a check mark in front of the first item in the Paper Menu list, which is Default Source.
-
We want to select the Configure MP option. The Configure MP option usually is the 3rd item in the Paper Menu list.
-
To select the Configure MP option, use the down or up arrowheads, which encircle the large check mark button, to move the little check mark that is in the window.
-
When the little check mark is in front of the Configure MP option, press the large check mark button, which is located in the center of the OP console. This enters your choice and will then display the list of Configure MP options.
-
-
Getting to the Option that is Named: ‘First’
-
The Configure MP list will now display. There will be an asterisk (*) in front of the currently-selected option. By default, the selected option will be *Cassette.
-
For our purposes, the check mark needs to select the option that has the name: First.
-
This is usually the 3rd item in the Configure MP list.
-
If there is already an asterisk (*) in front of the option named ‘First’, then the change has already been made. To exit, press the Back button that is on the Operator’s Console several times until the OP display window displays the Ready list.
-
-
To select the option named ‘First’, use the down or up arrowhead to move the little check mark.
-
When the check mark is in front of the First option and to select, and save, this option, press the large check mark button.
-
Now, the asterisk (*) will be in front of the option: First.
-
The *First option means that the Lexmark will first attempt to use paper out of the Multipurpose Tray before using paper from any other tray.
-
-
Getting Back to the ‘Ready’ List
-
To exit and to return to the Ready list, press the Back button, which is on the Operator’s Console, several times until the OP display window displays the Ready list.
-
Download Drivers
Download and Configure the Kyocera Ecosys P2040dw KX Driver for the specific printer. Always download the latest Kyocera Ecosys P2040dw KX driver for the specific printer from the Kyocera support web site.
Setup Printer
Setup a printer for each tray using the Windows Add Printer option:
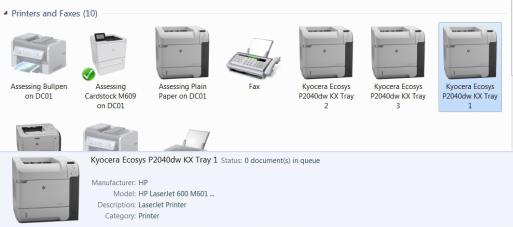
TRAY 1: under Printing Preferences
Label: Kyocera Ecosys P2040dw KX Tray 1
Paper Source: Tray 1
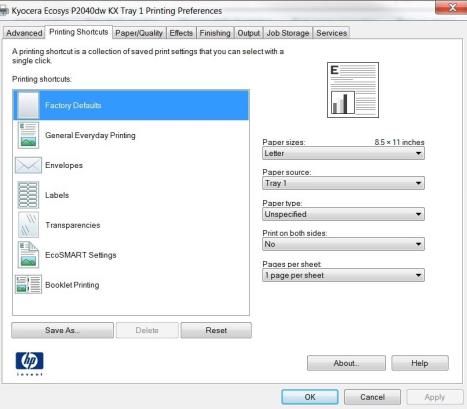
TRAY 2: under Printing Preferences
Label: Kyocera Ecosys P2040dw KX Tray 2
Paper Source: Tray 2
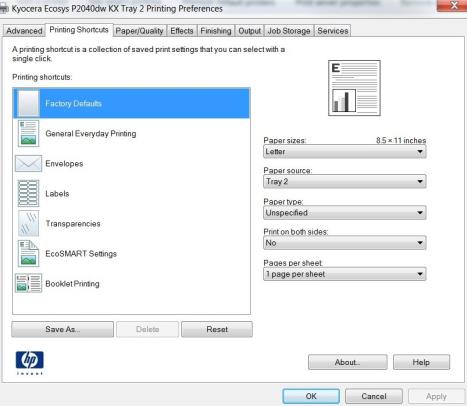
TRAY 3: under Printing Preferences
Label: Kyocera Ecosys P2040dw KX Tray 3
Paper Source: Tray 3
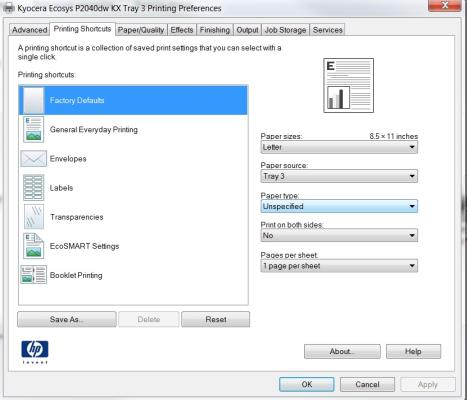
- Load paper in each tray
- Tray 2: plain white paper
- Tray 3: DMV watermark paper (RDMV 344)
- Verify that the tray stopper is set to "LTR" for each tray.
- Print a Windows "Test Page" for each paper tray for the appropriate paper.
- Configure the Avitar Clerk software using the Printer Setup menu option:
- Utilities > System Administration > Printer Setup
- Hardware Configurations:
- Tray 1 - Manual paper feed
- Tray 2 – top paper drawer
- Tray 2 – bottom paper drawer
- Paper Source Options:
- Default = based on workstation printer option and/or receipt option
- Upper = tray 1
- Middle = tray 2
- Lower = tray 3
- Manual = tray 1
- Prompt MP = prompt to load paper in the tray 1 before printing
TITLE (Tray 2):
- Physical Printer: Kyocera Ecosys P2040dw KX Tray 2
- Paper Source: Default
- SAVE
- Print a Test Page
- Not working – Change Paper Source to Upper
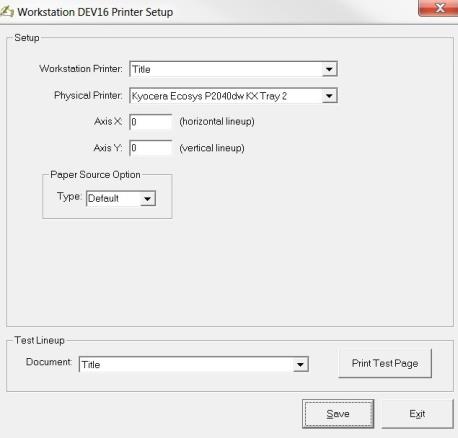
REGISTRATION – LASER PRINTER (Tray 3):
- Physical Printer: Kyocera Ecosys P2040dw KX Tray 3
- Paper Source: Middle
- SAVE
- Print a Test Page
- Not working – Change Paper Source to Lower
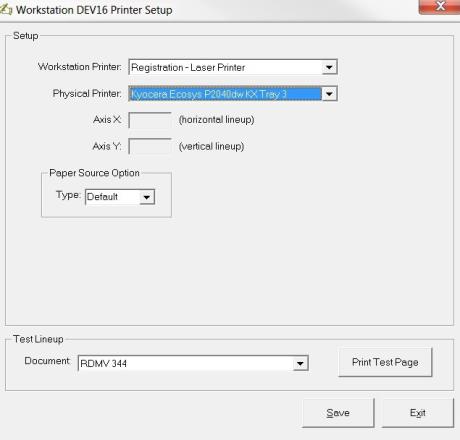
RECEIPT
For the DSMV 255a on watermark paper (Tray 3):
- Physical Printer: Kyocera Ecosys P2040dw KX Tray 3
- Paper Source: Middle
- Receipt Option: DSMV 255a
- Copy Option: 1
- SAVE
- Print a Test Page
- Not working – Change Paper Source to Lower
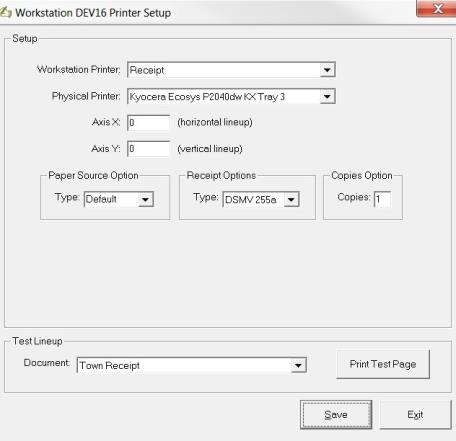
For the DSMV 255a on plain paper (Tray 2):
- Physical Printer: Kyocera Ecosys P2040dw KX Tray 2
- Paper Source: Default
- Receipt Option: DSMV 255a
- Copy Option: 1
- SAVE
- Print a Test Page
- Not working – Change Paper Source to Upper
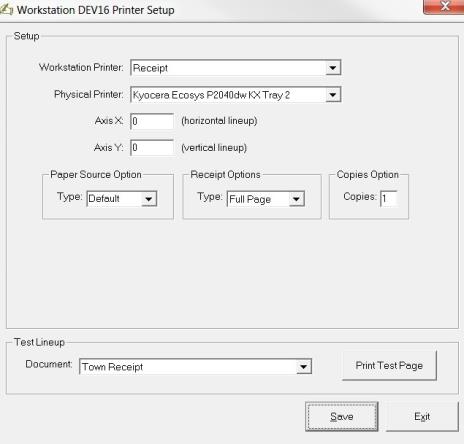
For the Full Page on plain paper (Tray2):
- Physical Printer: Kyocera Ecosys P2040dw KX Tray 2
- Paper Source: Default
- Receipt Option: Full Page
- Copy Option: 2
- SAVE
- Print a Test Page
- Not working – Change Paper Source to Upper
DMV SS/CR MEMOS
For the DMV SS/CR Memos on watermark paper (Tray 3):
- Physical Printer: Kyocera Ecosys P2040dw KX Tray 3
- Paper Source: Middle
- SAVE
- Print a Test Page
- Not working – Change Paper Source to Lower
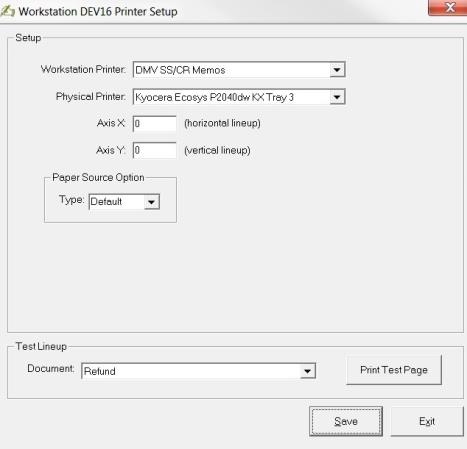
For the DMV SS/CR on plain paper (Tray 2):
- Physical Printer: Kyocera Ecosys P2040dw KX Tray 2
- Paper Source: Default
- SAVE
- Print a Test Page
- Not working – Change Paper Source to Upper
DMV FORMS VALIDATOR
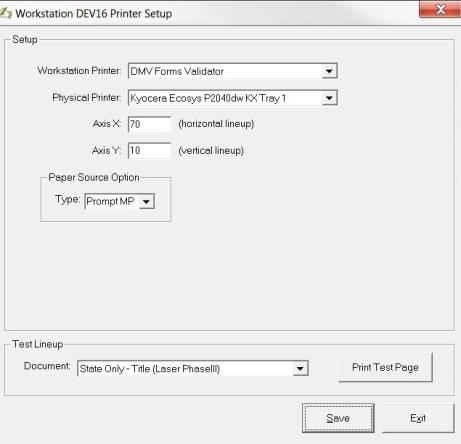
- Physical Printer: Kyocera Ecosys P2040dw KX Tray 1
- Change Axis X to 70, Axis Y to 10
- Paper Source: Prompt MP
- SAVE
- Put a piece of white plain paper in the Manual Paper Feeder
- Print a Test Page
- Not working – Change Paper Source to Manual
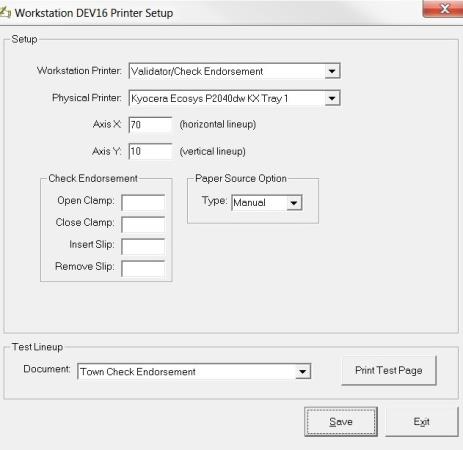
VALIDATOR/CHECK ENDORSEMENT
- Physical Printer: Kyocera Ecosys P2040dw KX Tray 1
- Paper Source: Manual
- Change Axis X to 70, Axis Y to 10
- SAVE
- Put a piece of white plain paper in the Manual Paper Feeder
- Print a Test Page
- Not working – Change Paper Source to Manual
CASH DRAWER
If the workstation does not have a cash drawer, do not assign a printer since this will cause a blank paper to print after fee settlement.
APG Cash Drawer Model 554(USB)
- Install OPOS .ocx modules
- Printer name: APG Cash Drawer Model 554(USB)
- The following values are hard-coded in the clerk program, set them to match the values in the device's firmware and INF file:
- VendorID = &H7C5 OR 1989
- ProductID = &H500 OR 1280
- Utilities > System Settings > Printer Setup
- Workstation Printer: Cash Drawer
- Physical Printer: SE1500
- Set Open Type: Command
- Open Code: &%D1
- Cash Only
- Cash Only – to open drawer for cash transaction, but not checks
- Click “Save” button.
- Click “Open Cash Drawer” button to test opening the drawer
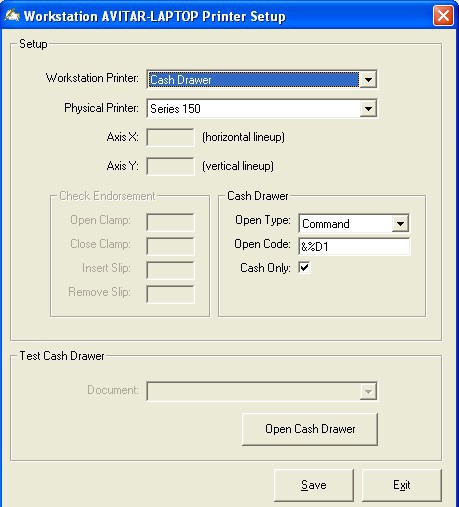
Cash Drawer Series 53/150 Printer Setup
- Utilities > System Settings > Printer Setup
- Workstation Printer: Cash Drawer
- Physical Printer: Series 150 Cash Drawer
- Set Open Type: Command
- Open Code: &%D1
- Cash Only
- Cash Only – to open drawer for cash transaction, but not checks
Note: For Series 53 Cash Drawer use Open Code: &%DF
- Click “Save” button.
- Click “Open Cash Drawer” button to test opening the drawer
OPOS Generic Cash Drawer(USB)
- Install OPOS .ocx modules
- These values are hardcoded in the clerk program:
- Open("CD554")
- ClaimDevice(500)